

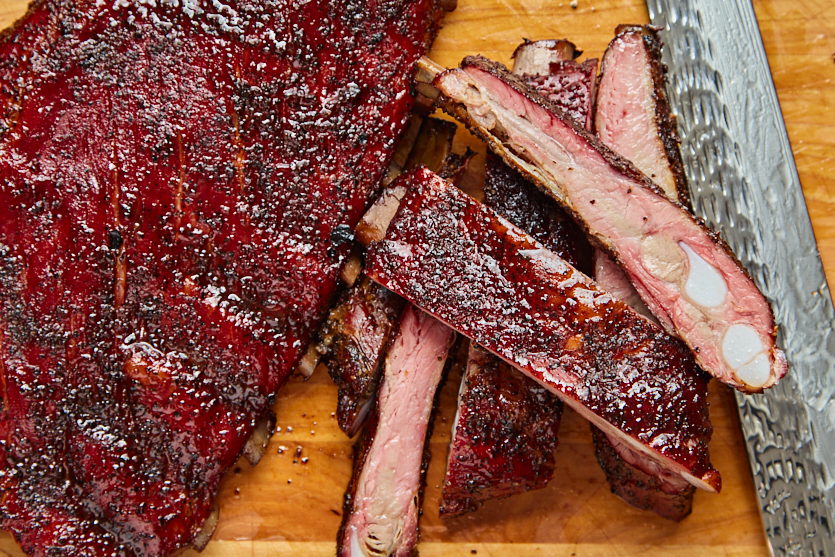
Texas-style spare ribs seasoned with salt and coarse black pepper smoked low and slow for maximum smoke flavor and spritzed with a maple, apple-cider vinegar mix to give a sweet glaze.
Equipment
- Pellet grill with a second rack or a way to elevate the ribs
- 1 water pan for the cook chamber
- 1 Infrared Thermometer
- 1 Heat Proof Gloves
- 1 Roll of extra-wide heavy-duty aluminum foil
Ingredients
For the ribs
- 1 rack spare ribs
- kosher salt to coverage
- coarse ground black pepper to coverage
For the spritz
- 3 cups water
- 3 cups apple cider vinegar
- 1/4 cup maple syrup added partway through
For the wrap
- 2 tbsp butter
- reserved maple spritz
For the glaze
- 2 tbsp vinegar-based BBQ sauce I use my beet BBQ sauce
- 2 tbsp cup water
Instructions
Meat selection is everything. Pick a rack with good meat coverage. Skip the ones with thin ends and exposed bones, since those bones will burn. If a thin rack is all you can get, trim two or three bones off the end so the rest stays edible.
Preheat
- Start at 200°F. Turn on extreme smoke mode if your grill has it.
- Put a water pan in the cook chamber on the lowest shelf and keep water in it.
Prep the ribs
- Remove the ribs from the packaging and flip them over so the underside is facing up.1 rack spare ribs
- Trim off any ends that are not clean or are thin. These will just burn during the cook.
Keep the ribs cold right up to the moment they hit the smoker. Smoke vapor condenses more efficiently on a cold surface. If the smoker isn't up to temp yet, put the ribs back in the fridge, or the freezer in a pinch.
Remove silver skin
- To remove the silver skin, insert a butter knife between the silver skin and the meat toward the middle of the rib to give yourself space. Don't start at the ends – those are much harder to separate.
- Once it is separated, insert your finger to create more space. Then, take a paper towel and grab the silver skin where you lifted it up and pull. The paper towel creates friction to help you grip it.
If you want the most smoke penetration, remove the silver skin.
Season
- Pat the underside dry with a paper towel.
- Season the underside (the bone side) first with salt then pepper.kosher salt, coarse ground black pepper
- Flip over and season the topside (the meat side) first with salt then pepper.kosher salt, coarse ground black pepper
You don't need a binder. The moisture from the ribs is enough to make the seasoning stick.
The coarse pepper does real work here. The large pieces of pepper physically traps smoke particles. Do not use fine-ground pepper since it won't grab nearly as much smoke particles.
Skip heavy sugar rubs at the start. Sugar melts, forms a glaze, and sheds smoke particles, so you end up with a sweet rib that never picked up much smoke.
Smoke
- Place the rack on the top shelf.
Heat radiating from the bottom of a pellet grill will scorch the underside of the racks and dry them out, leading to an uneven cook.
Hours 0 to 2: low and slow
- Keep the lid shut as much as possile. Check the surface about every 45 minutes to an hour, mostly to make sure it isn't getting too hot. If one spot is too hot, like near the lid where the sun's beating down, scooch the ribs to a cooler part of the chamber. Otherwise leave it closed.
- Using your infrared thermometer, check the temperature of your ribs. Once the surface gets up around 140°F, often near the 1-hour mark, it's time to start spritzing.
If you're lookin', ya ain't cookin'.
If you're running more than one rack, swap the top and bottom racks about every hour so everybody gets even time.
Hours 2 to 3.5: build the smoke ring
- Open the lid every 30 to 45 minutes and spritz with a 50/50 mix of apple cider vinegar and water.
- Mix a big batch of spritz, 1 part water to 1 part apple cider vinegar, so you've got room to add maple later without making a whole new batch.3 cups water, 3 cups apple cider vinegar
The point of spritzing isn't flavor, it's moisture. A wet surface holds smoke. Each spritz also drops the surface temperature by roughly 20°F (I've watched it fall from the high 140s back down to around 120°F), which puts it right back in the range where it takes on the most smoke.
Hour 3 to 4.5: add the maple
- Starting at hour 3, add maple syrup to your spritz and shake well.1/4 cup maple syrup
- Continue spritzing every 45 minutes until hour 4.5.
Wrap (the Texas crutch)
- Lay out two wide sheets of heavy-duty foil. Shiny side toward the meat, dull side facing out. Shiny side out radiates heat back in and dries the ribs faster.
- Put the ribs face down on the foil. Spritz the underside heavily with the maple mix, add butter, then spritz the presentation side heavily too. Fold it up tight like you're wrapping a present, sealing every edge so the juices stay in. Watch the corners, because the bones will stab right through the foil. If you puncture it, just wrap another layer around it.2 tbsp butter, reserved maple spritz
- Bump the smoker to 250°F and cook until about hour 5 to 5.5.
Wait at least 4.5 hours before wrapping because foil completely blocks the smoke. You're ready when the bark is a deep mahogany red and the crust is set, and when you lift the rack from the center the surface just barely starts to tear. If it's tearing hard, you've gone a little far and may already be done, which is fine.
Glaze + finish
- For the last 30 to 45 minutes, unwrap the ribs (keep the foil and the juices, you will need them again) and flip them presentation side up.
- Glaze with a thinned, vinegar-based sauce. I use my beet BBQ sauce, watered down hard so it goes on thin and doesn’t goop. Keep the sugar content low. Put about 1/4 cup of sauce in a bowl, add a little less than 1/4 cup of water to start, and check it. If it’s soup-thin, go. If it’s still gloopy like gravy, add the rest of the water. It’s eyeballing, just find the happy medium.2 tbsp vinegar-based BBQ sauce, 2 tbsp cup water
- Brush both racks and finish with the foil open, glazed side up, so the glaze sets and gets sticky.
Bend test and rest
- Lift the rack from the center with heat-proof gloves. When it bends significantly and the surface starts to tear, they’re done. I like mine tender with a little resistance, not fully falling off the bone. If it still feels stiff, give it another 30 minutes to an hour.
- Once the ribs have the right amount of bend, remove them from the smoke and place them back in the foil. Wrap and let them rest for 1 hour.
Slice
- Flip the rack bone side up to cut. The bones are easier to see from underneath, so the knife follows them cleanly and you get fewer bad cuts and more meat per bone.
Watch the bone shapes. Around the thickest part of the rack the bones alternate, one straight, the next much more curved. Follow each bone's own curve instead of cutting one straight line, or your slices come out off. (You show this in the visual on the recipe, cutting alongside the long straight bones first, then the curved one next to it.)
Nutrition
Calories: 515kcal | Carbohydrates: 10g | Protein: 24g | Fat: 39g | Saturated Fat: 14g | Polyunsaturated Fat: 6g | Monounsaturated Fat: 14g | Trans Fat: 0.5g | Cholesterol: 131mg | Sodium: 166mg | Potassium: 486mg | Sugar: 9g | Vitamin A: 117IU | Calcium: 50mg | Iron: 2mg
 What do you think of this recipe?Keep scrolling for the full recipe post. Please consider Leaving a Review!